This is an exercise I came up with after seeing Peter O’Sullivan do something similar bilaterally with his back pain patients. After experimenting for a few days, I came up with this variation to solve the problem of the Quadriceps and/or the Lower Back muscles doing too much work while the Soleus, Hamstrings and Glutes not doing enough work.
The Soleus Slouch solves this problem and gives the Soleus, Hamstring and Glutes an opportunity to work together without the ‘Quadriceps’ or ‘Lower Back Muscles’ taking over. It is a stable in the ‘Go To’ Physio Mentorship program and has since become very popular on the web and has featured in David Grey Rehab Lower Body Basics Program and his Achilles Program. Alex Morrel, another ‘Go To’ Therapist Mentorship graduate also frequently posts his athletes performing this exercise.
It will improve ankle joint range of motion, ligament load tolerance and hit a variety of muscle groups, especially the posterior chain and lower leg muscles.
I use this exercise with knee pain, groin pain, ankle mobility issues, achilles tendinopathy, and general muscle tightness issues to name a few in the clinic on a daily basis.
So Why Is The Soleus Slouch So Effective And Gets Results Fast For Patient’s Not Progressing?
Building tension through the midfoot delays knee extension and allows the Hamstring to work isometrically, allowing the force to transfer through them to the glute so that it can actively hip extend at the top of the movement (rather than the knee snapping back, creating ‘fake’ hip extension). The beauty of the neck and low back being relaxed is that the Soleus muscle, Hamstrings and Glutes have no choice but to tolerate load because the ‘Back’ or ‘Neck’ can’t cheat and take over.
It is important to note you MUST have ideally cleared the ability to ‘co-contract’ the knee joint on the bed with the coordinate testing example outlined in chapter 4 of my book ‘Happy Progressing Patients’ and the midfoot bridge test before using this exercise. This ensures the hamstrings have an appropriate level of load tolerance so the patient can be successful with this exercise. If they don’t have an adequate load tolerance and you progress the patient too quickly, you will notice the knee will keep snapping back and you will quickly become frustrated at the patient’s inability to do the exercise correctly.
No amount of conscious cueing will solve the problem from my experience. It is simply a case of right exercise at the wrong time for the patient.
Presuming it is the right exercise at the right time, let’s go ahead and explain how to get the most out of the exercise.
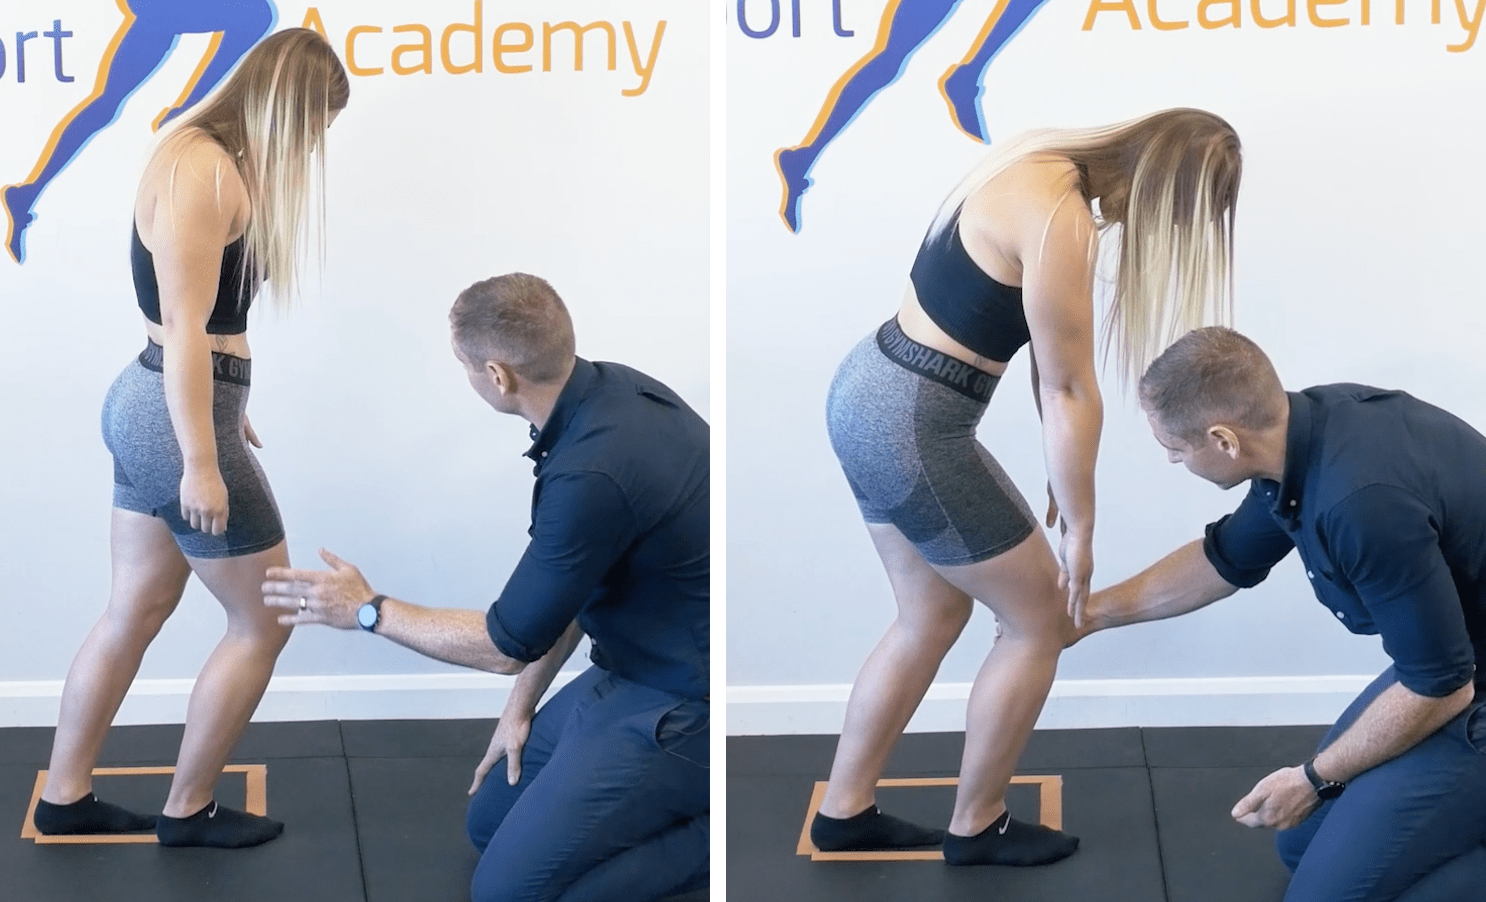
Step 1. Starting Position For The Soleus Slouch
Start in a split stance position with one foot in front of the other. Challenge the patient’s base of support and shift your weight forward by cueing the patient to bring their ribs, pelvis and sternum (entire body) over the mid-foot with the leg that you want to load in front and the knee slightly soft (about 10-20 degrees flexed).
Ensure they don’t hip hinge and the whole body actually comes forward in order to genuinely challenge the base of support and command the subconscious mind’s attention.
The weight comes forward onto the mid-foot with little to no weight through the heel (although the heel does not lift off the floor).
It is also important that the back leg’s big toe is in line with the front legs heel.
Often the patient’s nervous system will try to ‘cheat’ and increase the base of support by increasing this distance by moving the back leg further away from the front leg and taking some of the load in the process.
Step 2. Next Undo The Nervous System’s Adaptive Movement Strategies
Once you have the start position, get the patient to relax the neck (chin to chest) and slouch the shoulders. The patient should immediately feel more load now going through the front leg’s mid-foot and Soleus and gastrocnemius.
This position alone may be enough for some patients initially and you will immediately see the person’s conscious mind focus on the exercise like magic. You may also notice their breathing rate changes, indicating that we also have the autonomic nervous system’s attention.
Before we go any further it is important to note that the key thing throughout this exercise is that the knee stays forwards and does snap back.
If the patient has poor intent through the mid-foot, the knee will likely snap back, and for the first couple of reps you may need to give them some feedback with your hand to keep the knee forwards, or use a top down cue to keep the knee forwards and really ‘squash the orange’ through the mid-foot.
Step 3. Further Increase Load Tolerance On The Ankle And Calf Muscles
Keeping the start position, get the patient to reach the fingertips towards the floor. If the patient is struggling with this level of load tolerance, you may start by only asking them to reach as far as the knee.
If you notice the knee beginning to flex at this point, it may indicate the inability of the ribcage to depress and retract and the low back muscles to lengthen which may give clues that this may also need to be addressed.
Don’t underestimate how challenging this exercise can be even for professional athletes. For most patients, this will be the first time in a long time that all of these tissues take the stress have tolerated this level of load without ‘cheating’.
Step 4. Allowing The Gluteal Muscles An Opportunity To Do More Work
To come back up again, the patient must still keep the chin tucked and the lower back relaxed to avoid ‘cheating’ and doing some work as the intent once again comes from the mid foot to initiate the return to the start position.
Keep a close eye on the knee snapping back. This would indicate that the Quadriceps are overpowering the hamstrings inability to delay knee extension. You can continue to cue the patient to ‘squash an orange’ initially to increase the conscious intent for the Soleus and Hamstrings to do more work. Ideally the patient keeps the heel flat but the intent is all through the mid-foot and ankle joint plantar flexion.
The first few sets of this exercise will usually be slow, guarded and ‘top down’ while as the load tolerance improves, the patient will quickly move towards a smooth and faster ‘bottom up’ approach.
Soleus Slouch Sets And Reps
I usually start with 3 sets of 6 repetitions which will all be quite slow and it is often not uncommon for a patient to then progress all the way up to 3 sets of 20 repetitions within a few days.
I inform the patient to start with 3 sets of 6 reps and work towards the 3 sets of 20 reps by the time I see them again. They will often look at you in shock initially but by the following week will have mastered this key skill of delaying knee extension and allowing the hip an opportunity to do more work without the Quadriceps or Lower Back muscles doing too much.
In the ‘Go To’ Physio Mentorship, we can add subtle variations to this powerful exercise to put more or less load on certain muscles/tissues in the frontal and transverse planes also, depending on the findings of the objective assessment.
How Is Your Current Lower Limb Rehab And Clinical Step By Step Approach?
Do you currently understand the ‘why’ behind everything you’re doing and prescribing?
If you’d like some help putting together a structured step by step system into your clinical approach so you can have the confidence to keep any complex patient progressing just click on this link here and schedule a call to find out more about the ‘Go To’ Physio Mentorship Program and get all your questions answered.
Get Your FREE Copy Of The Amazon #1 Bestseller That Holds The Secret To Confidently Treating Any Patient!
Download a Free ‘ebook’ copy of the 8-Step ‘World Cup’ Treatment Plan that helped my private patients achieve full recovery and made me a ‘go-to’ physio for complex cases…
Get Your FREE Copy Of The Amazon #1 Bestseller That Holds The Secret To Confidently Treating Any Patient!